5. Video Playback and Display Options
As of iOS 3.2, Apple has changed the way the MPMoviePlayerController
class works. In previous versions, videos were always played in a
full-screen player interface. The iPad now offers an enhanced movie
player that can be displayed in either full-screen mode or embedded
within your app's views.
The YouTube app that's included
on the iPad is a perfect example of this new video functionality. In
landscape orientation, videos play full-screen as usual, but in
portrait orientation, videos play within the app's interface, as shown
in Figure 6.
One of the many
advantages of this embedded player feature is that it gives you the
option to allow users to interact with other elements in the app while
the selected video plays. The enhanced movie controller also enables
developers to change videos without initiating new controllers, overlay
additional views on top of the current movie, generate thumbnail images
from video frames, control the playback options via code, and much more.
It's
important to note that in order to provide these new capabilities and
the improved playback interface, some of MPMoviePlayerController's
previous API has been deprecated, replaced with new methods and
properties. This was necessary in order to provide developers with more
granular control over the presentation of the movie. For example,
instead of the movie player controller handling the video's
presentation on the screen, it now provides a view object that acts as
a container for your video content, giving you much more control over
the movie's overall display and playback within your app. If you're
porting existing iPhone movie player code to an iPad app, you'll need
to modify that code to ensure that it works properly in iOS 3.2.
Beyond the iPad's display,
there's also new support for presenting content on an external monitor
or projector when connected to an iPad. Using the screens method of the UIScreen class, you can program your iPad app to detect if an external display device is connected via a compatible cable. UIScreen
also includes methods and properties for not only accessing the
external screen's resolution, but also for configuring your app's
content for proper viewing on the connected device. But this feature
isn't limited to mirroring your iPad's screen. You can also project any
additional view onto the external display by assigning it to that
screen object. This will prove to be a very valuable feature for iPad
developers building business and media apps that need to present
content on a desktop computer monitor, a projector screen, or even a TV.
6. Split View Controller
After popovers, the new
split view controller is the second most distinctive feature that
distinguishes iPad apps from their iPhone siblings. Navigating back and
forth between various views is a good solution for the small iPhone
screen, but on the much larger iPad display, that interface mechanism
is no longer necessary. To make efficient use of the iPad's extra
screen real estate, while also helping developers migrate existing
iPhone navigation systems to the tablet, Apple introduced a new view
controller called the UISplitViewController.
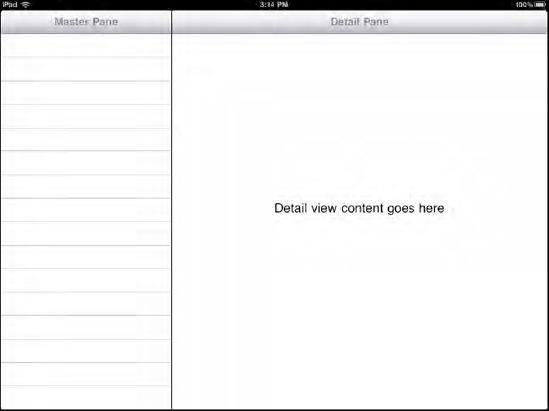
True to its name,
a split view controller contains two panes: master and detail. The
master pane typically holds the navigation or primary table view for
the app. Within the master pane, users can make selections. If a chosen
item requires a display, then its data is loaded into the detail pane.
For example, in a note-taking app, the master pane would list all of
the user's saved notes. Selecting a note would open it in the detail
pane, where it could be read and edited by the user.
The master pane is fixed at
320 pixels wide, while the detail pane consumes the remaining width of
the window. Notice the recurring 320-pixel width? Just like the default
width of popovers, this was a strategic design decision by Apple to
make the conversion of iPhone apps into iPad apps as painless as
possible. A navigation bar from an iPhone app could be repurposed for
use within the master pane of a split view-based iPad app.
In landscape orientation, the
master pane is located on the left side, and the detail pane is on the
right side of the screen, as shown in Figure 7.
See how the detail pane includes a toolbar at the top of the view to
match the toolbar or navigation bar in the master pane? Not only does
the consistency provide a visually pleasing and balanced interface
design, but this layout also reinforces Apple's push for consolidating
an iPad app's primary buttons into a top-aligned toolbar.
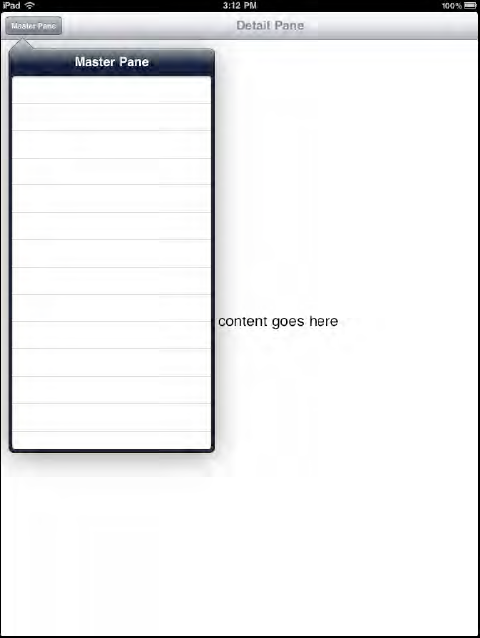
Beyond aesthetics, the
detail pane's toolbar serves another important purpose for the split
view controller. To help preserve your interface design within the
detail pane, rotating the tablet to the portrait orientation allows the
detail pane to use the entire screen. In order to keep the master pane
accessible to users, the split view controller automatically adds a UIBarButtonItem to the left side of the detail pane's toolbar. Tap that button, and a popover displays the master pane's view, as shown in Figure 8.
Since the detail pane usually
represents the detailed data of the item selected, the master pane
should reflect the current selection. So if it's a table view row, then
your code should ensure the selection remains persistent. In a simple
notes app, for example, if the user is viewing a specific note in the
detail pane, the master pane could visually indicate the current
selection by maintaining a highlighted or checked table view row of
that listed note.
Although the split view
controller handles much of its functionality for you, there are some
essential implementation details worth learning in order to customize
it for use with your own interface needs.
7. Modal Presentation Styles
As an iPhone developer, you're already familiar with how to make a UIViewController
modal, which prevents the user from returning to the parent window
until the modal view is closed. A modal view is a great solution when
you need to present a much more sophisticated layout than what's
possible in a limited UIAlertView.
On the iPhone, a modal view
fills the entire screen, which is perfectly fine with only 320 by 480
pixels. But on an iPad, there's considerably more display space, so you
may not always want a modal view that stretches the full 1024 by 768
pixels. To accommodate the larger surface area, Apple has introduced
four new modal style options, which can be assigned to a new UIViewController class property called modalPresentationStyle. As on the iPhone, you still call a modal view via presentModalViewController, but before doing so, you simply assign one of the new style options to the view controller's modalPresentationStyle property.
For example, let's say your code already has an instance of UIViewController named myController. You could assign a modal style to it before presenting it on the screen, like this:
myController.modalPresentationStyle = UIModalPresentationFormSheet;
   [self presentModalViewController:myController animated:YES];
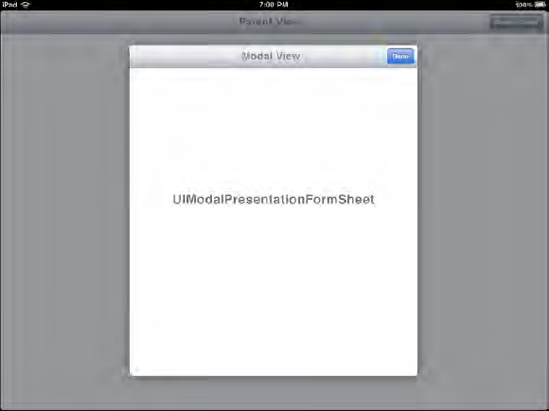
As you can see from that code snippet, one of the new style options is UIModalPresentationFormSheet,
which has a fixed size of 540 pixels wide by 620 pixels tall. Being
smaller than the iPad's window, it is displayed in the center of the
screen, with the parent view dimmed gray behind it, as shown in Figure 9.
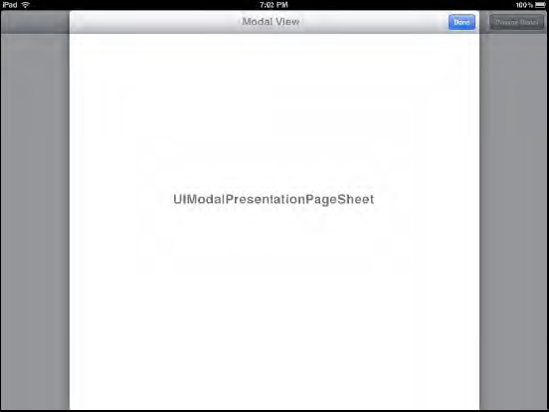
The next option is UIModalPresentationPageSheet,
which assumes the current height of the screen and a fixed width of 768
pixels. This means that in portrait orientation, it appears to fill the
entire screen, but in landscape orientation, the dimmed gray parent
view can be seen in the background on both sides, as shown in Figure 10.
If
you do need the modal view to utilize the entire screen, you can set
the modalPresentationStyle property to UIModalPresentationFullScreen.
But what do you do when the rare need arises to display a modal view
within a popover or one of the split view panes? That's where UIModalPresentationCurrentContext
comes to the rescue, presenting the modal view in the same size as the
parent view that called it. For example, a
UIModalPresentationCurrentContext-assigned modal view shown within a popover would use the same width and height dimensions as the popover.
Even though tapping outside
a popover will automatically dismiss it, that won't work with modal
views. Just like its counterpart on the iPhone, a modal view needs to
be programmatically closed on the iPad. This can be achieved by
including a Done button (as shown in Figures 9 and 10) or by designating this task to some other user interaction within the modal view.
8. Advanced Input Methods
iOS 3.2 also includes a new set
of custom input methods that developers can use in their apps: edit
menu actions, keyboard layouts, and gesture recognizers.
8.1. Edit Menu Actions
Depending on the object you
tap and hold your finger on, the small, black edit menu that appears on
the screen will display one or more of the default menu actions, such
as Copy, Cut, Paste, Select, Select All, and Delete. Now, with access to the UIMenuController, you can insert your own custom actions into the edit menu for a specific object.
A custom menu action consists of a UIMenuItem with a title property and an action selector. You then assign your UIMenuItem to the UIMenuController
of the appropriate object type. In order to facilitate the target
action behavior, you also need to identify a target for your new menu
item by setting the applicable view as the first responder for that
action. The last step is to write the actual action method for handling
that task if the user selects it.
For
example, if you wanted to add a custom menu item for a thesaurus when a
text word is selected, you could create a new UIMenuItem
instance with the title Thesaurus that points to an action selector
thesaurusLookup. Add that UIMenuItem to the UIMenuController assigned
to that text object, and your custom ThesaurusCopy, Cut, and Paste
options in the edit menu. The assigned target would be the parent view
of that text object. The parent view controller's source code would
need to include your action method, thesaurusLookup, so that when a user selects that menu item, your app knows how to respond. menu item will appear along with the default
When you add custom
items, keep their menu titles short, with no more than one or two words
per item. To prevent users from being overwhelmed, try not to add too
many additional items to an edit menu. If you need to provide several
options to the user, you should consider presenting them in a popover
action sheet instead.
Eager to add custom menu items (such as the one shown in Figure 11) to your own iPad apps?
8.2. Keyboard Layouts
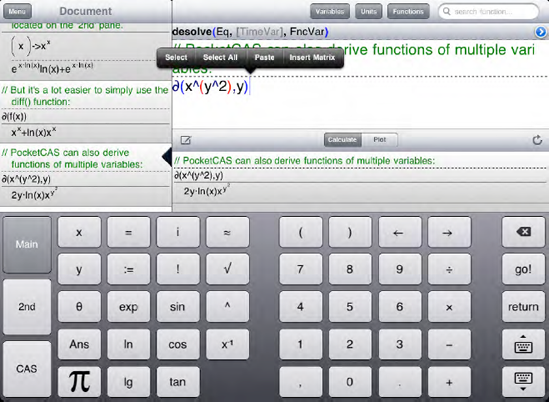
Did you notice the unique keyboard in Figure 11?
No, it's not an interface trick. No longer limited to only the standard
keyboard, you now have a way to present your own keyboard layout, which
is nothing more than a custom view. To replace the system keyboard, you
assign the view to the inputView property of a UITextField, a UITextView, or any compatible responder object.
Since users are already
familiar with the system keyboard, don't stray too far from the default
design when creating your own custom keyboard. Make sure the buttons
appear tappable and automatically size to display well in both portrait
and landscape orientations. The background of your view should extend
to the full width of the screen. The height is flexible, but Apple
recommends sticking with the same height as the system keyboard for
consistency when possible. As an example, the PocketCAS app shown in Figure 11
does a nice job of emulating the look and feel of Apple's virtual
keyboard design, which reduces the learning curve for first-time users.
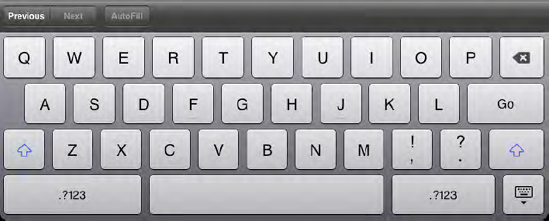
If you need to
insert only a few additional buttons to the existing system keyboard,
another option is to add a keyboard extension, called an input
accessory view. If you've ever filled out a web form in Mobile Safari,
you may have noticed the extra translucent black toolbar that runs
across the top of the keyboard, as shown in Figure 12.
As with a custom keyboard, this is accomplished by creating a view that
contains the additional interface elements you want displayed above the
keyboard. Whereas a keyboard replacement uses inputView, your input accessory view should be assigned to the inputAccessoryView property instead.
8.3. Gesture Recognizers
The user interface components in the UIKit framework include handling for basic touch events, such as tapping a UIButton,
but what if you need to add event handling for specific touch behavior
to a custom view or object? To help simplify what was previously a
laborious task, Apple has provided iPad developers with a new UIGestureRecognizer
class for easily detecting touch gestures. UIKit includes six common
gesture recognizers, which are subclasses of UIGestureRecognizer:
UITapGestureRecognizer: Finger taps.
UILongPressGestureRecognizer: Holding a finger down on one spot.
UIPinchGestureRegnizer: Pinching fingers in and out.
UIPanGestureRecognizer: Dragging a finger.
UISwipeGestureRecognizer: A quick finger swipe.
UIRotationGestureRecognizer: Rotating two fingers in opposite directions.
To add a gesture recognizer to a view, you first create a new instance of one of the six UIGestureRecognizer
subclasses. Like a custom edit menu, an action selector is assigned to
the gesture recognizer instance. This informs the view which method to
call when the user performs that gesture. Some gesture recognizers have
configurable attributes, such as numberOfTapsRequired, which sets the number of taps for a UITapGestureRecognizer.
In order to give the gesture recognizer a target, it needs to be
attached to the view by calling the addGestureRecognizer method.
If you do use one of the
standard six gesture recognizers in your app, it's important to use it
for an action that users associate with that gesture. For example,
people know that finger pinching is typically used for zooming in and
out of an image. If your app uses that UIPinchGestureRecognizer
for deleting files, the unorthodox use of that gesture will only lead
to confusion (and possibly even rejection from the App Store).
If you need a unique gesture recognizer, you can create your own subclass of UIGestureRecognizer and override all of its methods (such as touchesBegan, touchesMoved, touchesEnded, touchesCancelled, and reset)
with your desired functionality. The drawback to implementing support
for custom gestures is that they are unknown touch commands. It becomes
your app's responsibility to properly educate users on how to use the
new gestures. Unless you have a compelling reason to go this route,
sticking with the well-known, common gestures is usually the best
approach.
9. Document Support
The iOS does a good job
of hiding the underlying filesystem, so that users can focus on
creating and consuming content. But the iPad's larger screen encourages
greater productivity, so situations arise where users will want to
control how some files are opened and shared between apps.
In the past, this was always
tricky due to how each app was limited to its own "sandbox" directory,
but with iOS 3.2, Apple introduced a new file-handling mechanism called
Document Support. Apple's built-in Mail app is a good example of this
new feature. If an e-mail contains a file attachment, it's displayed as
a file icon at the bottom of the message. If you currently have an
installed app that has registered itself with iOS as the "owner" of
that file format, the e-mail attachment's file icon will reflect that
app's icon. For example, if the e-mail attachment is a Microsoft Word
document and you have Apple's Pages installed on your iPad, the file
icon may look like the Pages app icon. As expected, if you tap the
file, it will open in Pages. Since both Mail and Pages are Apple apps
running on an Apple tablet, this comes as no surprise.
But the real beauty of
Document Support is the power it provides to developers. It also allows
a user to open that e-mail attachment in any other registered app that
supports that file type! If you hold your finger on the e-mail
attachment icon, a popover will appear with a few options. One option,
of course, is to open the file in its owner app. In the case of the
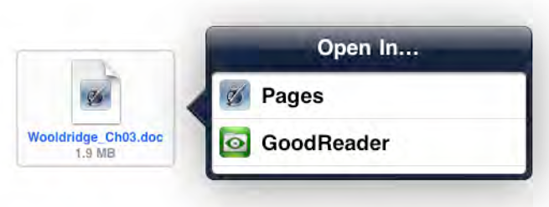
Word document, that option might be Open in Pages. But one of the other
options is Open In.... Selecting Open In...
replaces that popover with a new popover, listing all of the registered
apps that can open Word documents. I happen to have the excellent app,
GoodReader, installed on my iPad, which also supports Word files, so
it's listed alongside Pages in that Open In... popover, as shown in Figure 13.
If I select GoodReader from the
list, the Word document not only opens in GoodReader, but a copy of the
file is also stored in GoodReader's file directory, accessible to me
any time I run GoodReader. This is a safe and sanctioned way to
transfer a file from one app to another, without sacrificing the
security of an app's sandbox.
So how does this all work?
There are actually two factors that make this functionality possible:
the sender app and the receiver app, both of which require different
development steps. In Figure 3-13, the Mail app is the sender app, and Pages and GoodReader are receiver apps.
In order for your app to send a file to another app (as Mail does), you need to use the UIDocumentInteractionController
class. A document interaction controller communicates with the iOS to
see if the selected file can be previewed by the system and if any
other installed apps are registered to open that file format (the Open
In... popover list).
If you want your app to act
as a receiver, it needs to notify the iOS registry of the specific file
types that it can open. This is done by including each supported file
type in the CFBundleDocumentTypes key of your app's Info.plist
file. Each file type declaration consists of four attributes: name, the
related uniform type identifier (UTI), handler rank, and file image
icon. The handler rank informs the system whether your app is the owner
of the file type (such as your own proprietary file format) or is
simply capable of opening that kind of file. The image icon is optional
for file type owners (which will be discussed later in the section
"Required Project Resources for iPad Apps").
If your app is
registered with iOS as supporting a particular file type, then it will
need to be able to field requests to open related files upon app
launch. If another app, such as Mail, uses a document interaction
controller for that file type and a user selects your app from the Open
In... list, your app needs to be ready to handle that request, which is
delivered to the application:didFinishLaunchingWithOptions
method in your application delegate. The request arrives with an
options dictionary that includes important information about the file
your app needs to open, such as the file's location, the sender app's
bundle identifier, and an annotations property list object that
contains additional data about the file.
If your iPad app opens and
saves files, you really should take advantage of the new Document
Support feature. It provides greater flexibility for your app's
offerings and better interoperability with other installed apps.
10. Universal Applications
Even though most iPhone
apps will run on the iPad, their smaller dimensions appear rather
pixelized and inferior to native iPad apps. But some developers may not
want to maintain two separate Xcode projects for essentially the same
product in order to properly support both platforms. To solve this
problem, iPhone SDK 3.2 introduced a new universal application format
that runs on both iPhone and iPad devices. Depending on the device
running the universal application, the appropriate version of the app
is launched. This way, you can maintain one Xcode project with shared
source code, but design separate user interfaces specifically tailored
for each platform. For example, your iPhone app may use a navigation
controller for organizing content, yet on an iPad, you would most
likely want to display a split view controller instead. Both versions
use the same data, but present it in different ways that best suit the
chosen device.
For developers
targeting both platforms, Apple highly recommends building universal
applications. Managing and updating only one application in the App
Store makes it much easier for customers who use your app on both their
iPhone and iPad. But if your iPad version is radically different from
your iPhone app, with dozens of new features that require a fairly
hefty code rewrite, a universal application may not be the ideal
choice. If the two versions don't share much in the way of code, it may
make more sense to build them as two stand-alone products: one for the
iPhone and one for the iPad. There are also business and marketing
factors that come into play as well, which we'll explore in the
upcoming "To Be or Not to Be Universal"
section. If you do make the decision to distribute your product as a
universal application, it requires some extra planning and effort on
your part.
10.1. Universal App Requirements
The first minor hurdle
for universal app development is orientation. With the iPhone's small
screen, providing an efficient user interface design often requires a
dedicated orientation, such as a portrait-only app. That's perfectly
acceptable on the iPhone, but the iPad's larger display allows more of
your interface elements to be consolidated into a single window,
providing enough screen space in both portrait and landscape views. In
fact, Apple insists that iPad apps should support all orientations. If
your iPhone app is locked into a single orientation, you'll need to
configure your universal app project to accommodate multiple
orientations when displaying your iPad version's user interface.
So how does the app
differentiate between your iPhone code and your iPad code? This is
where we encounter the next hurdle in developing universal
applications. Not only does your app need to detect the current
platform and run the appropriate code, but when compiling your project
in Xcode, you'll need to properly "wrap" your iPad code to prevent
compiler errors. Remember that in producing a universal application,
the iPad features exclusive to iPhone SDK 3.2 will cause compiler
errors when Xcode is building the iPhone portion of the app, so you'll
need to use conditional coding to prevent that from happening.
Although you may be
tempted to simply check the user's device type or operating system
version, with Apple constantly releasing new devices and iOS versions,
that's not the way to go. A better approach is to test for the
availability of exclusive iPad classes using NSClassFromString. If you pass an iPad-only class name, such as UISplitViewController to NSClassString and a valid object is returned, you'll know the user's device is an iPad. If nil is returned, then that iPad class doesn't exist, so the user's device is an iPhone or iPod touch.
For new iPad functions that
have been added to existing frameworks, checking the class name's
existence will not be effective. In those cases, you can compare a
specific function name with NULL. If an iPad-only function is equal to NULL, then the user's device is not an iPad.
You'll also need to
perform similar code checks if your app utilizes hardware features that
are available on only one of the platforms, such as the iPhone's
camera. And don't forget your .xib
interface files and images that are uniquely designed for a specific
screen size. Since your iPad app may require a different interface and
graphics than your iPhone app, your view controller classes will need
to be programmed to load the correct resources.
All of this talk about
conditional coding may sound like a lot of work, and truthfully, it is
fairly time-consuming to implement at first. But your efforts will
prove worthwhile when working on future updates of your app. Adding new
features to a single Xcode project that shares common code between the
two platforms is much more time-efficient than needing to add the same
code to separate projects.
10.2. To Be or Not to Be Universal
From a development
standpoint, there are many advantages to creating a universal
application, but is it the right choice for you? If your app is free,
then your goal is to provide the most convenient, user-friendly access
to it. A universal application makes it easy for users to download your
app across all of their Apple mobile devices. But paid apps are a
different story. Putting aside the technical benefits for a moment,
let's look at the business factors involved.
If your iPad app
represents an enhanced edition, offering dozens of exclusive new
features that are not available in your iPhone version, it may make
more sense to release it as a separate, stand-alone iPad app. As a
universal application, existing owners of your iPhone app will be able
to access the iPad version for free, since there's no official upgrade
mechanism supported in universal applications. By selling the iPad app
as a separate product, you have the opportunity to recoup your
development costs. And if it provides additional value above and beyond
your iPhone edition, then most customers won't have a problem with
paying for it, even after they've already purchased the iPhone version.
I say "most" because there will always be a select few users protesting
that they should receive all app versions for all applicable Apple
devices for free. Ironically, the loudest complaints usually come from
people who paid only 99 cents for your original iPhone app. But don't
cut off a potential revenue stream that could help support your
continued development just because you're worried about keeping
everyone happy. Here's a little secret: It's not possible to please
everyone. Just build the best features and user experience possible. If
you provide your customers with additional value, most of them will be
more than happy to pay for the enhanced iPad version.
On the other hand, if your
iPad app does not offer anything new beyond an iPad-optimized interface
slapped on top of the same iPhone feature set, you may want to consider
a universal application. If you can't justify the iPad app price with
additional iPad-exclusive functionality, selling it as a separate
product will definitely attract an angry mob of customers, wielding
pitchforks and writing negative App Store reviews! And Apple may just
agree with them. Apple has been known to reject stand-alone iPad apps
that don't add any significant value beyond what's available from their
iPhone counterparts. In these situations, Apple usually advises the
developer to convert it into a universal application before
resubmitting it to the App Store.
Another major issue to
consider is the file size of your app. A universal application combines
the incremental code and separate .xib
files and image resources for both the iPhone and iPad versions into
one package, which means it can often be nearly double the file size of
a single platform app. Although Apple recently raised the cellular 3G
download limit from 10MB to 20MB to help accommodate universal
applications, some content-heavy apps such as games may still exceed
that file size. If your universal application is larger than 20MB, that
drastically reduces your app's potential audience to only people within
Wi-Fi range. Whether your app is free or a paid product, this factor
alone may force you to release separate iPhone and iPad versions to
ensure that your app can be downloaded by both Wi-Fi and cellular 3G
connections.